
DIY Vacuum Still, Part 1 focused on the concept of the process (form), whereas Part 2 is focused on how to put the hands on the system (function) and make it work. This is where form meets function. It forced me to dissect the process and answer lingering questions I wanted to look at. To my great surprise, this is easier than I thought. This has been a great learning experience, enjoyable, and a ton of effort. Still, I’m excited to show you the economical and fun DIY way I solved the expensive ethanol recovery problem for home cannabis and CBD crafters everywhere.
I’m presenting an overview of what I’ve learned for educational purposes. It’s a starting point and launchpad for anyone who wants more control over their ethanol extraction processing science. This post will focus on the hands-on aspects of working with a DIY vacuum still.
Explaining concepts and theories that are unfamiliar to readers can get word-heavy and confusing. Especially when done in great detail. Please watch this video demo to see the system, getting it going, and that the reality is straightforward compared to reading about it. This video should breathe great life into the words that follow, then come back to it later when necessary to tie the prose together.

DIY THE SYSTEM TOGETHER
Putting together and working with a system like this isn’t for everyone. It takes up a bit of space and requires some hands-on attention. However, the advantage of putting your system together is that it’s almost infinitely customizable to any budget and need. It’s for those who want absolute control over their cannabis extraction craft with excellent economics. I suggest it’s better, faster, cheaper, and more fun than any alternative!

GREAT VALUE: MORE FOR LESS
Getting started can be as inexpensive as around $350. If you already have a vacuum chamber and pump, it can be half of that. Adding more expensive component options can reach about $950, but that’s the upper limit. Both price points are for any volume you want to work with. The integrated in-process feed makes the volume a non-issue!
I’m so excited about bringing this project to the community. First, anyone can start at the low-end end price-point and upgrade components as they build skills, confidence, and enjoyment. Second, the DIY systems already include components you would have to purchase separately in addition to buying a Source Turbo or EtOH PRO. The vacuum pump can be used for filtration, and the recovery vessel and lid can be used with the pump for post-processing as well. It’s a lot of bang for your buck!

I can assemble a system that performs the same function as the Source Turbo ($600) but also includes more volume, faster processing, mixing capabilities for post-process formulation or decarbing, filtering, and post-process purging capabilities. A magnetic stir plate, Buchner flask, condenser, reclaim, and pump set for around $700. Those same capabilities with the Source Turbo would total about $1,300.

Regarding value, the starting $350 DIY version, including filtering and post-processing capabilities, is a great entry point and can do everything the $2,000 EtOH PRO can do and more. There are many combinations and great economics to take advantage of.
COMPONENTS
The system components should be arranged for the best performance to take advantage of gravity with the vapor movement, condensing process, and reclaim flowing downhill like a waterfall. The downward flow from the condenser to the reclaim vessel helps the system to self-clear.

Heat source (HS), Loading vessel (LV), Loading vacuum lid (LVL), Transfer tubing, Condenser (C), Reclaim vacuum lid (RVL), Reclaim vessel (RV), Cooling pan (CP), Vacuum pump (VP), Vacuum tubing
Heat source (HS)
This component became much less complicated once I realized the reasoning error I was making concerning the heat application assumptions mentioned earlier. Almost anything will work, from a cheap analog hotplate to a more expensive IH single cooktop with a low-end temp of 140°F or less. Obviously no burners with open flames!
I like the IH option because it’s very fast, even heat dispersion, and it doesn’t have the hot disk heating element (often uneven) that the analog options do. For those unfamiliar with IH, it’s worth mentioning that only IH-compatible pots can be used with the cooktops. IH tops also have a lower profile and more surface area for stability and safety. Having said that, the inexpensive analog tops work just fine.
Loading vessel (LV)
The loading vessel can be a simple pot from the kitchen cupboard. It’s important to know that vacuum lids are only available in limited sizes. The lid size that will be used must be known before an appropriate loading vessel can be chosen.
Non-stick surfaces work the best. Not because they are “non-stick” but because the slight texture allows heat to phase change and release much easier. Smooth surfaces like glass, stainless steel, ceramic and enamels don’t work well on their own. Smooth surfaces can work with the addition of boiling beads or chips to aid in energy release and boiling. Using beads or chips are a small complexity but it’s not overly onerous if you want to use stainless.
Loading vacuum lid (LVL)
I’ve been working with both polycarbonate and glass lids. Both have been working fine so far, but I would opt for glass when available. Glass lids are currently only available with two holes, so I’ve chosen a two-piece hardware set. One ball valve for a vacuum break and one straight port for the vapor exit. The ball valve doubles as an in-process fee port to load additional wash without stopping the process.

I’m working with 1/4-inch barb hose connectors because that’s what’s available. A larger hole for the vapor port exit would be more beneficial, but I haven’t found an easy off-the-shelf option yet. I hope to have that sometime shortly.
The LVL seals have extra width for seating error, but the vessel must be centered on the seal area. If the lid is too small with the rim of the LV close to the edge of the LVL, it can cause a vacuum failure mid-process, and the lid can fly off and throw ethanol all over. This lid popping can also happen if the lid is the correct size but isn’t centered carefully at the beginning when initiating vacuum. It doesn’t happen when operated correctly, so take a moment to ensure the lid is centered well before applying the vacuum, beginning the process, and checking periodically throughout the process.
Transfer tubing
Transfer tubing connects different components that transfer air, vapor, and liquid through the system. All tubing must be suitable to work under vacuum and food-safe with ethanol vapor. Most of the tubing I’ve been using is either 1/4 or 3/8 inch inner diameter (ID), depending on the size of the connections on the lids and condenser. It’s OK if there are points where the tubing sizes don’t match. A simple 1/4 to 3/8 inch connector can be used to assemble them.
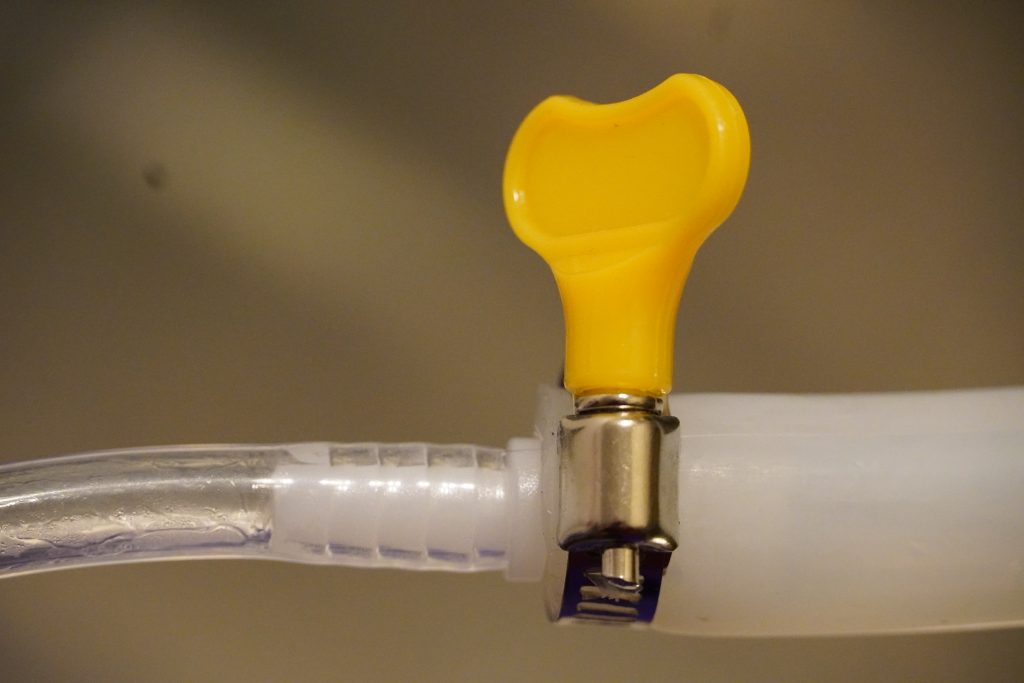
Each section of tubing will be 1-4 feet long, depending on how the components are set up. Ensure there isn’t tension on the short sections of tubing, causing them to kink and cut off any flow volume. I highly recommend getting a bunch of butterfly hose clamps to secure the attachment at every connection. This small thing can save a lot of headaches if something starts trying to leak.
I would advise not to skimp on the tubing. I always buy more than I think I’ll need because, like bacon, having too much is always better than not enough.
Condenser (C)
The single requirement for a condenser is that it provides adequate cooling to condense vapor from the LV into a liquid. Essentially, temperatures are low enough for long enough to cool the warm vapor. Various combinations of dry ice, regular ice water baths, coolers, buckets, flexible tubing, stainless steel tubing, preassembled containments with coils, etc., have worked well. I think it’s better to err on the conservative side that more cooling is better than not enough.

Some of the things I tested:
- 2 gallon bucket with 10 feet of 3/8” silicone tubing.
- Large rectangular cooler filled with ice and 20 feet of 3/8” silicone tubing.
- 5 gallon drink dispenser cooler with 60 feet of 3/8” braided PVC tubing coiled inside.
- Stainless steel 50 feet coil stretched in a cooler dry ice and ice bath.
- Stainless steel 50 feet tight coil in smaller cooler dry ice and ice bath.
- Pre-made stainless 50-foot coil condenser assembly dry ice and ice bath.
I haven’t used a “Jockey Box” made for drink dispensing, but it would work well.
Make sure to clean any coils very well. Stainless coils can have oils and metal shavings in them that will otherwise end up in the reclaim on this run, then in an end product, next time with the reclaim is re-used to make a wash.
When using ice, it needs to be an ice bath, a combination of ice and water like what’s used in a champagne bucket to keep the bottle cold. If there’s no water, the ice clumps together and melts away from the warm coil, leaving an air gap with no cooling effect. You will need a lot of ice, so plan well ahead. “A lot of ice” means one or two large bags of ice sold at the store.
I’ve been experimenting with a hybrid cooling system of adding dry ice blocks in open food-saver bags into an ice-water bath. I’m clipping the tops together loosely above the waterline so dry ice stays dry, and they aren’t in a closed bag that could build pressure and cause a problem. This has been working pretty well to keep the chill going.
Reclaim vacuum lid (RVL)
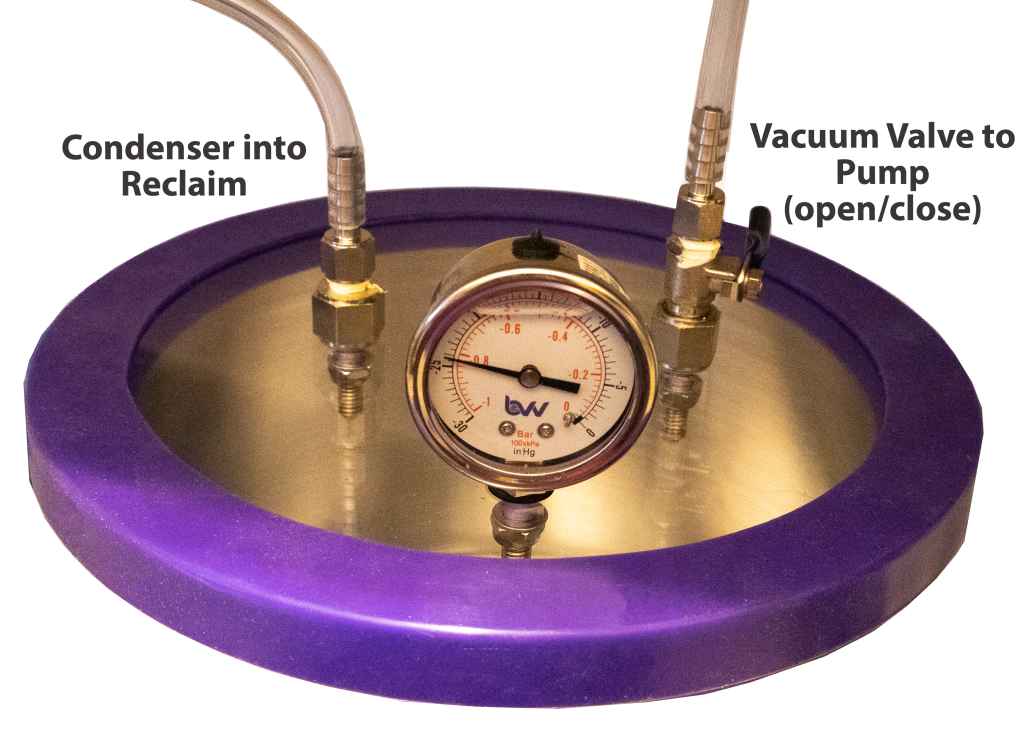
The RVL is similar to the LVL with the addition of a vacuum gauge. The straight port will receive the condensate from the condenser for collection, the ball valve connects to the pump and the vacuum gauge allows for monitoring system pressure levels. The ball valve connected to the pump opens and closes the system to vacuum during operation. The valve is in the open position when applying vacuum. Then, when the prescribed vac level has been achieved the valve is closed so the pump can be turned off. If the system is in balance, almost the entire operating time will occur under this condition with the system closed and pump turned off.
A vacuum chamber set is an excellent option for this component because it can also be used for post-processing. The set will include both the RVL and the RV at a reasonable price. If you already have a vac chamber set, you may be able to use that! Just make sure the lid material and hardware are compatible with ethanol.
*Because this lid has three holes, it seems polycarbonate is the only option currently.
Reclaim vessel (RV)
The RVL can be paired with about any RV that holds the required liquid volume, withstands vacuum pressure, and fits the RVL properly. Another pot from the cupboard can work well for this, or, as mentioned above, the RV and RVL can be purchased together as a vacuum chamber set.
Cooling pan (CP)
Nothing special is needed for this component. All that is necessary is something, plastic or metal, that is shallow and can hold the RV with some ice under it. Only the bottom portion of the RV needs to be cooled or sitting on ice. Do not submerge or make it difficult to access and handle the RV during the process.
Vacuum Pump (VP)
When I began working on this project, I was worried about the pump selection and expense. Once I understood a few important things, I worried no longer. First, even with slow pumps, the pump down speed is relatively fast. Second, processing with only about 80% of full vacuum is possible. Third, and most importantly, working with the system in balance substantially reduces (nearly eliminates) in-process VP activity, so vapor intake isn’t stopped but is much less of an issue.
Added bonus: these pumps are much quieter than ExtractCraft equipment, and there’s no frequent pump failure (and expensive replacement cost) like with the EtOH PRO.
Two categories of pumps can be considered: rotary vane oil pump or diaphragm oil-less pump. Both have distinct strengths and weaknesses.
Rotary vane oil pump:
Advantages – They are very fast and have a low ultimate vacuum.
Disadvantages – Ethanol vapor will eventually ruin or catch the VP on fire.
A cold trap can mitigate the amount of vapor intake, but when the pump runs, the vapor moves so fast that eliminating the problem 100% isn’t possible.
Diaphragm oil-less pump:
Advantages – Resistant to damaging effects of ethanol vapor and simply vent it.
Disadvantages – Typically expensive, slow, and don’t have a low ultimate vacuum.
For the wet environment operation of a vacuum still, a diaphragm pump rated for solvents (ethanol) works very well. Fortunately, with a suggestion from a member of IchiBan’s Extraction Lounge FB group, I found a powerful, little, inexpensive diaphragm pump I had not known about. It’s pretty impressive so far. It gets almost to full vac, the first I’ve seen from such a small and inexpensive pump.
Vacuum Tubing
Tubing is typically included along with the pump. This tubing does not come into contact with the ethanol that will be reclaimed or reused, so the material isn’t as important as the transfer tubing. It is essential to ensure the tubing is the proper size to fit onto the RVL valve or prepare a connector that will fit appropriately.
OPERATE THE SYSTEM IN BALANCE
I dreaded this part for fear of explaining a long list of significant variances, complications, and solutions. I’m thrilled to say I’m still shocked at how simple it is to run this system. To be perfectly clear, it’s only simple if you pay close attention to the setup and follow the operating guidance carefully. Paying attention will result in balance and easy operation, whereas inattention will become wrestling with the system the whole time.
Operating in Balance – General Idea
What does having the “system in balance” mean? It’s not a proper scientific term, but I’m sure there’s a calculation for it out there somewhere that I wouldn’t understand. Balance happens when the amount of heat, vacuum, and cooling work to create a smooth and acceptable rate of producing vapor, condensing it, and collecting the liquid condensate at a reasonable pace without having to run the vacuum pump hardly at all. This balanced state allows vapor to be fully contained in the closed system with nowhere to go. Contrarily, if it is out-of-balance, either the production rate will be slow (maybe so slow as to be non-existent) or too fast, so the pump has to run far too much and is constantly intaking and exhausting ethanol vapor. The more the pump runs, the more ethanol is wasted and vented into the surrounding air, possibly creating a dangerous situation and putting wear on the pump. We really want balance. It’s simple to achieve, and when it hits, it’s like an incredibly Zen-like cruise control.
When in balance:
Heat and vacuum levels are working well together when there is an aggressive but even boil, smooth flow of vapor from the LV into the condenser, condensed ethanol in steady and easy movement from the C into the RV, and the RV pressure remains unchanged with no need for vacuum level adjustment. The exit tubing from the C and the RV should be room temp or cooler to the touch.
When out of balance:
1) Nothing is happening.
Either heat and/or vacuum is significantly inadequate. If there’s a leak, it will be easy to see by a steady decline in vacuum on the vacuum gauge. If the vacuum gauge is holding steady, the problem should be fixed by adding heat, increasing vacuum (lowering pressure), or both.
The process will also go flat when uncooperative smooth surfaces like stainless steel or glass are used in the LV, even when the temp and vacuum inputs would otherwise be in balance with an excellent production rate.
-OR-
2) The system is overly active.
If the boiling action is out of control, vapor aggressively shooting through the condenser or air and vapor shooting through the tubing into the RV, there is probably too much heat and/or vacuum. The exit tubing from the condenser will become warm to the touch, as may the RV itself. Lowing the heat or releasing just a touch of vacuum should get it back to balance.
Applying Heat
Understanding how much heat to apply can be a little tricky without first understanding how boiling points are affected by vacuum. The best example most people are familiar with is boiling water. Water boils at 212°F (at sea level) and is impossible to get any hotter when boiling away on the stove, regardless of how much heat you throw at it. When more heat is applied, the boiling becomes more vigorous, indicating the rate of evaporation increases, but the temperature won’t actually rise. The extra heat is absorbed and exhausted through the phase change to gas and dissipated with evaporation. The evaporation dissipating the excess heat also keeps the pot from getting too hot until the water is all gone, and then the pot can absorb so much heat it may eventually melt on the stove.

Keeping the water idea in mind, take a look at this photo. Even though I’m pumping 224°C (435°F) into this beaker of ethanol under vacuum, the beaker and the ethanol are only around 100°F, and I can handle the beaker easily. If the beaker was empty, it would be incredibly hot.
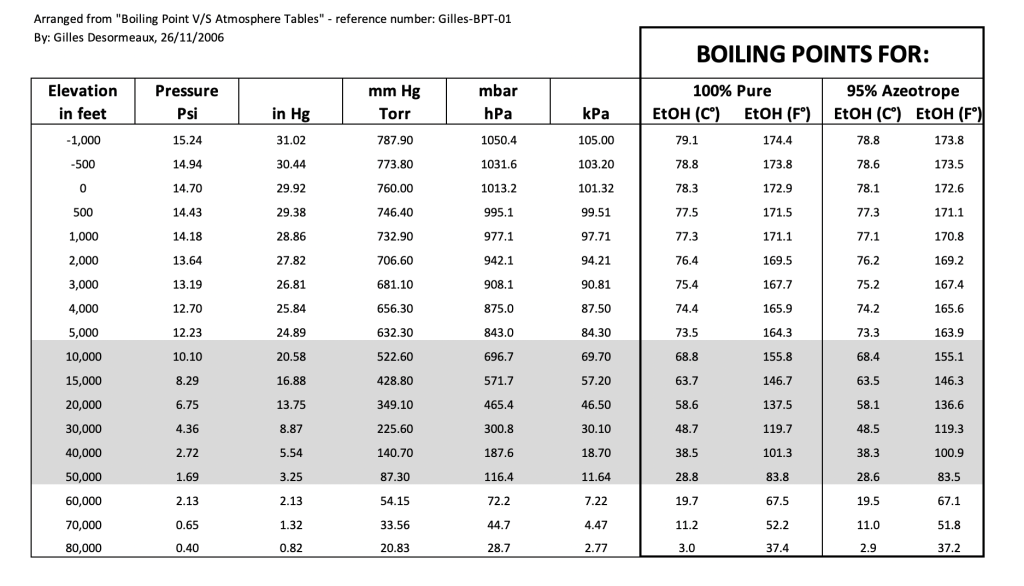
It’s just like the water on the stove, but by using vacuum, I can lower the boiling point of the ethanol to around 100°F, and as long as the vacuum level is held steady, the ethanol should stay at that same temperature. Apply more heat, and the rate of evaporation increases. Less heat lowers the rate of evaporation. Either taking place with the ethanol at the same temperature. Below is a chart from information collected by Gilles Desormeaux with ethanol boiling points at various pressure/vacuum levels.
I made the frustrating and silly mistake of trying to find heat sources that would hold temp at around 100°F to process at a target temp of 100°F. At first glance, this makes sense, but when you think of boiling points, vapor pressure, and heat transfer, it turns out that in the reduced vacuum environment, that 100°F heat input would be inadequate for a reasonable production rate at 100°F. This is why we don’t have to worry about having a heating source that holds around 100°F but something with a low temp of around 140°F to start.
You can see in the example where Low is registering about 135°F under standard atmosphere, but I’m working at a higher setting between Low and Medium at only around 90°F under vacuum. Even on Medium, it’s 190°F at ambient atmosphere and only around 100°F under vacuum.
Applying Vacuum
Theory:
Vacuum is applied to control the temp of the LV contents. The boiling points table above shows that 101°F will be at 80% of full vacuum. Adjusting vacuum to this level should be pretty close to this target. At a fixed heat input, more vacuum will lower the processing temp while less vacuum will raise it.
Reality:
DIY systems don’t maximize lab vapor flow efficiencies from the LV and through the condenser, so more vacuum than 80% will probably be necessary. (Especially on a speed run: more on that some other day.)
This is much easier than it sounds, and there’s a lot of room for error and experimentation. Around 100°F is necessary for making dabs, but working at 110°F-120°F can be acceptable for end products that will be decarbed for edibles and such.
Pressure gauges equalized at elevations above sea level read 1 in Hg lower for every 1,000 feet of elevation.
Monitoring Temp
Monitoring temp during the process is a little tricky. It’s best to have a thermometer in the LV and an IR heat reading gun for the outside to monitor the heat. Having both allows you to cross-check and confirm against each other.

Getting a thermometer in the LV is not easy….but I’ve made it easy. On the LVL vacuum break, a 1/4-inch section of tubing can attach easily and hang down a little. A donut-shaped 3/8 inch piece of tubing can go around the 1/4 inch tubing like a collar, slice the thermometer between the two, and situate to be visible through the lid.

The IR heat gun is a little tricky as well. When using one to monitor in-process temps, a few things are essential. First, they don’t work on reflective surfaces. They reflect and give an inaccurate reading. Mat black surfaces work the best. Second, hold it very close to where the temp reading is wanted to avoid error. Second, the contents of the LV cannot be taken through the LVL. Only the temp of the LVL will register and not the contents. Third, they aren’t always accurate, so check and know the deviation.
Pacing For Condenser
The last piece of the balance puzzle is to make sure the condenser can keep pace with cooling the amount of vapor traveling into it. The amount of heat a condenser can displace depends on factors like the material, length, and width of the coil/tubing, how fast the vapor is moving, and the temperature in the condenser containment (heat shedding, surface area, time, temp).
All the possible combinations to put a condenser together can be overwhelming. I worked with silicone, PVC, and stainless steel tubing ranging from 16 ft to 60 ft for the coil and used both dry ice and regular ice (ice bath) for cooling. The faster you push the process or the hotter it’s running will require more cooling at a given point of time, but over longer term slower runs will need about the same overall cooling. I hope that makes sense? You can creep the processing rate (pace) with a shorter coil and less cooling; it’ll just take longer. Or, you can push the pace faster with increased coil surface area and more drastic cooling.
Bonus Cheat For Maintaining Balance!
I found a very simple cheat that appears to be incredibly helpful in maintaining balance even when the vapor is moving too fast and would otherwise build pressure and require more pump activity and vapor venting. This is the cooling pan on the component list. By cooling the reclaim vessel, any vapor that shoots through the condenser has nowhere to go, and the RV acts as a secondary condenser. With the cooling and vapor in check, the pressure in the system remains stable and continues processing without needing the vacuum to be applied. A good fan providing some cooling can work in some cases, but in heavier cases, setting the recovery vessel on ice works best.
STEPS FOR PREPERATION & OPERATION
These are the basic steps for preparing and operating the vacuum still. With experience, everyone will find tricks and preferred methods that work better for them and differ from these basic steps, but this is an excellent base to start with.
PREPARATION
STEP 1
Put all the components in place and attach the tubing.
STEP 2
Vacuum test the assembled, empty system and ensure it holds vacuum with the system closed and the vacuum pump turned off. If it doesn’t hold vacuum, the system will be troublesome to work with, so stop here, find the leak, fix it, and test again before moving on.
Any threaded port piece is a possible point of compromise for a vacuum leak.
Teflon tape can/should be used to avoid any problems at those points.
STEP 3
Load the condenser with ice or dry ice and put the RV on ice. Let set for 30-60 minutes to cool parts.
*In humid climates, you may want to have the system under vacuum to purge the air during this cooling time to limit the amount of moisture condensation/contamination.
OPERATION
STEP 1
Load wash into LV with plenty of head space so boiling contents are not sucked into the vapor exit on the lid. If some boiling wash gets sucked through by accident, it’s not a big problem and won’t damage anything, but the reclaim won’t be clean.
STEP 2
Bring temp of the uncovered LV and contents to around 100°F.
*This step can be skipped, and heat can be applied after vacuum has been applied. The advantage of using this step is that there is immediate feedback when vacuum is applied in the following steps.
STEP 3
Put LVL on. Make sure it is centered well and confirm the release valve is closed.
STEP 4
Engage the pump with the RVL valve connected to the pump open and watch the pressure gauge as the vacuum level lowers.
STEP 5
Watch the LV as the contents begin to boil.
STEP 6
When the boil reaches a reasonable rolling boil, close the valve on the RVL and turn the pump off.
STEP 7
Observe and make small adjustments to heat and/or vacuum to get the system into balance, and the pressure remains steady when the system is closed.
This sounds like there is a bunch of tinkering to get into balance, but once the boil is going and the system is closed in step 5, it should be pretty close to the target levels.
Don’t be alarmed if there’s little action coming out of the C. That’s often a good thing, indicating the vapor slows and condenses properly in the C. There’s a lot of tubing for the vapor and condensate to travel through, and it takes a lot of vapor to make a little liquid, so the condenser can take a while to fill up and purge itself. As long as the temp in the LV is steady with a nice boil and the pressure in the RV stays even, the ethanol will slowly creep out and into the RV.
Things to watch for to ADD heat or vacuum:
- Reduction of boiling activity.
- Low temp of LV and contents.
- No vapor flow in tubing going into the condenser.
- Losing vacuum on the RV gauge.
Things to watch for to REDUCE heat or vacuum:
- Overly aggressive boiling.
- High temp of LV and contents.
- Vapor shooting through tubing too fast.
- Vapor clouding RV.
- Exit tubing from condenser warming.
STEP 8
Add wash with the In-Process-Feed option.
The vacuum break on the LVL can be used as an in-process feed to add more wash into the LV without breaking the vacuum and interrupting the process. Attach one end of a tube that attaches securely to the vacuum break port and the other into a jar with wash to be loaded. Open the vacuum break, and the lower pressure in the LV will suck the wash into the LV.
- Always operate the vacuum break VERY slowly.
- Keep the tubing submerged in the liquid to avoid losing vacuum.
- Adding cold wash to the warm environment can stop the boiling action until the newly added wash has come up to heat.
The in-process-feed control ability to manage volume with LV surface area is a fantastic advantage over the EtOH PRO.
STEP 9
Decided when to stop the process.
Stop early for collection ease.
The process can be stopped early in a somewhat liquid state for easy collection of the finished product and finished with open-air evaporation on a silicon mat.
Go all the way to oil.
To go all the way to oil at the end, you have to pay attention because things change quickly at the very end, and if it goes too far, the oil will be challenging to collect.
Catching it just right requires attention:
- Keep an eye on the level at the end.
- Pick up the LV and slowly and gently tilt and swirl the contents around to get a good idea of the viscosity.
- If it moves more like cooking oil than water it’s time to stop. If it’s not quite there yet set back on the heat.
- If it looks like it’s nearly finished, turn the HS off, add more vacuum, and swirl around a little more until you see the viscosity you like.
The ability to control the heat and vacuum with the LV in hand is an incredible control advantage that allows crafters to skip the significant stall of the EtOH PRO and avoid the substantial temp overshoot of the Source Turbo at the end of the process.
STEP 10
Stop the process by turning off the HS if you haven’t already, and break the vacuum from the valve on the LVL SLOWLY.
STEP 11
Open LV to collect concentrate and save reclaimed ethanol for reuse.
STEP 12
Post-process if necessary, and enjoy the fruits of your crafting!
COMPONENT SHOPPING LIST & DISCUSSION
The component shopping list will be available in the FB user group IchiBan’s Extraction Lounge. The shopping list will be in the files section of the group. If you would like to share any questions or something, please hop in the group and get involved. This is going to be fun and save people a lot of dollars.
SAFETY CAUTION – PROCEED AT YOUR OWN RISK
Safety considerations and cautions must be taken very seriously! Ethanol is highly flammable and can be very dangerous. Anyone deciding to work with these operations DOES SO AT THEIR OWN RISK. What I present here should not be considered fully comprehensive nor exhaustive, and everyone is responsible for their own safety review. The minimal safety considerations required without compromise are having excellent ventilation and no ignition sources in the area, and general fire prevention for highly flammable liquids must be carefully observed at every step. Very importantly, NEVER leave the system unattended or any component plugged in when not in use.
It’s incredibly important to know exactly what material is being used in tubing and confirm that it’s rated to work with ethanol at the processing temp. Failure to do so can result in potentially dangerous chemicals leaching into the finished product. Anyone buying distillation equipment is responsible for checking and double-checking that every component is safe before use.
Great read. You made me join Facebook/Meta. Now let me in the group so I can get shopping. lol Thx Man.
Request to join again and I’ll approve. The list will be ready in a day or two.
Excellent write up sir! Thanks for putting your energy into making this concise yet thorough.
Regarding the condenser coil, it’s worth mentioning that immersion chillers (wort chillers) can be found in local homebrew supply stores. They are either copper or more expensively, stainless. Other variants are plate chillers that use metal vanes for increased surface area yet smaller real estate, if space is an issue. There are plenty of diy instructions out there as well, since crafty homebrewers have come up with a lot of creative solutions to chill their solutions.. slightly different goals but the same simple tech for this application.
Maybe. I looks at the home brew equipment, but I think the problem is the speed of vapor under vacuum differential is substantially faster. The problem with the wort chillers are designed to work under ambient conditions which I believe will be inadequate unless you slow the production rate WAY down. It all depends on what kind of production rate you are looking for.
Troy thanks for all the time, effort, energy and love you’ve put in for this new adventure.
I really appreciate this effort. The only real problem I’m having is where to buy the material to make the machine. You give us all of the items needed but fail to tell us where we can purchase them. So it still makes it almost impossible to make
I think I mentioned the shopping list is located in the files section of our FB group. I believe the link is in the post. It’s called “IchiBan’s Extraction Lounge”
Thanks I appreciate your prompt response….what lead me to consider this option is the heavy duty Item sold has failed me 3x in less than 6 months (pumps)…it breaks my heart because the service is excellent unlike the pumps I need an option that works period.
Yeah, there’s some bad things going on behind the scenes at ExtractCraft that are compromising production quality pretty badly. Hopefully they survive but I don’t have much confidence
This works and is as reliable as possible
I spend a good day to read again and again until started to understand , at the end i try to register fb account just to get a part list , but they suspend it prob because i used protonmail or because i used mary jane as my name , so is there a way to get that part list? Can you please send it on my email?
If it is a new profile or doesn’t appear to represent a real person that will be a positive contributing member to the group it would most likely be declined. This is how we maintain the quality of information and integrity of the group. If you have a profile that is reasonable in nature just send a DM to the admin of the group explaining that you don’t use FB so you profile is new and you will probably be accepted to join.
This is a great set up, I do have a suggestion, for the heat source I’m thinking about using water bath and a sous vide controller, they can maintain precise temperatures upto about 200F
You can try it and do that if you’d like but it’s not a very good option in my opinion. I would suggest that a sous vide is too slow to respond when you want to make changes and too messy and cumbersome. It’s simply an unnecessary complication. A very rudimentary heat source works well.
You should also checkout the “Value at the Dispo” post
You input is heard and appreciated. However, I think your view and my view are substantially different. I’ve put thousands of hours into gaining the knowledge I share freely. Not only do I share it freely I have spent hundreds of hours structuring in the best way I can with my resources. For all of this effort the sites and maintenance cost $$$. From all of this I make exactly $0. I’m not promoting myself, I’m not doing anything but offering knowledge and constant support to the community via the FB group. Regardless of what I do, where I host it, or how I do it I constantly get an earful from people who know “better.” Well, all I can say is that I’ve done the best I can do and ask noting in return. I’m never going to make everyone happy. Just as I’m never going to have time to answer things that you can answer yourself, hence the “go buy it and see.”
As far as my mission, I think I’m doing just fine. Thank you
How about a new mission: A Lab. General I would suspect you have thought about it. Your Face book group with Crowd Funding-Naw-Private? I think some people around Here & FB would surprise you. I did buy 2 Orange.. Just a Thought..
Is this site still open? I joined Facebook just for this site over a week ago and asked to join this site but nothing has happened and now Facebook is stating the site may be closed.
If the profile looked sketchy it may have been blocked. What was the profile name and I can take a look.
Brian Hamilton. There shouldn’t be anything sketchy other than a blank Facebook as social media has never been of interest to me. Facebook will be deleted soon, especially if I don’t pass your muster as I only joined for this group. The extraction process looks interesting.
Facebook still says: “This content isn’t available right now
When this happens, it’s usually because the owner only shared it with a small group of people, changed who can see it or it’s been deleted”.
ok. Try one more time please. I will lookout for it. Really new or empty profiles are often from scammers or trolls so they usually get blocked. You should be able to look the group up now and I’ll approve as soon as I see it.
Thanks! I just sent a new request.
I’m curious what DIY condenser/coil you were using in your 35min video and if you still recommend that setup
That is the pre-fab condenser from BVV that is on the component recommendation list in the files section of the group. I like it because it’s very easy to handle and very well constructed. The downside is that it’s quite expensive and the most expensive component of the system. I think it’s worth the extra money if 1) you are sure you are going to use it quite a bit 2) you have the extra couple hundred to spend on convenience and long term use. If you are just getting set up and don’t want the larger upfront cost the other options I presented function just as well but with just a little more effort putting together.
Any chance you could let me view the FB group? You appear to have banned me from even viewing the group’s info after I requested membership. Thanks!
I normally don’t approve empty profiles to protect the integrity of the group. If you happen to have an FB account with a proper profile we could welcome that one
Hi Troy,
Fair enough. I do very, very little social media. 20+ years running ISP networks has made me jaded in that respect (well, most respects, but especially towards social media). I’ll just wing it with the info you have here, I guess. Thanks for the reply 🙂
And sorry for breaking the thread, but for whatever reason I can’t get a text box when clicking reply directly to your comment.
Ok, I get that. If taken the ban off that profile. If you want to request again I can approve it so you can check out the group
I was wondering how you really know that the silicon mat on which the concentrate is poured won’t leach any chemical? Food grade means safe for humans when used for making food; not when exposed to alcohol or chemicals like terpenes. Let me know and btw thanks for the excellent information.
I suppose since there are not really any chemicals in an inert object that is platinum cured and food grade I would turn the question around and ask what chemicals?
Hi Troy.I am a home hobbyst and have wasted lot of Ethanol left evaporated in my room.After Reading your writer up I saved some Money every now and then and started buying Pieces.Now,the problem Is vacuum pump.I bought a full set of Lab glass stuff and an heating plate to put my flask in a boiling bath,mount a fractional condenser etc,etc,all from Amazon.
Now,I saw your video and I don’t use FB,so I was wondering if a micro vacuum pump lets say like this:
https://a.co/d/fNnMB1S
or this:
https://a.co/d/dt54xxr
could work for our purpose and don’t break my empty wallet.
Thank you so much in advance
The pump recomendations and component list are in the group, that’s the only place it is. Otherwise you just have to figure out which of the types of pumps and quality you want to use.
Sorry Troy,I am Just confused as in your video I saw you running an oil vacuum pump but you wrote those are not meant to work with solvents and you Need an oil free vacuum pump.Since not everyone can get into the group unfortunately,is there a chance you could explain if I could get away with a cheaper oil pump like yours without a cold trap?
The pump I am using is an oilless diaphragm pump. Everything is in the blog and in the group so I can save time on explaining the same thing multiple times in multiple places so it’s easy to join the group if you choose to.
So after working with an air still for a couple times, I’m debating of stepping up my game and modify it to a vacuum still. This great write up seems to have everything to get me there so cheers to you!
I already own one vacuum chamber and will need to purchase another one for this system to work. Unfortunately all the vacuum chambers i see for sale online, including the one i already own, have a 3 way “T” valves while the ones you have pictured have two seperate valves. This may be another DIY thing but im wondering if these 3 way valves may be still used for the LV & RV, or maybe one but not the other? If so could you point me in the right direction please? I’d like to use the one i have and make the right purchase of the next one.
Here is the one i already own
https://www.amazon.com/ABLAZE-Gallon-Stainless-Degassing-Chamber/dp/B071KZXVRR/ref=sr_1_3_pp?keywords=ablaze+vacuum+chamber&qid=1701272354&sr=8-3
Modify the air still? I think you will have to scrap the air still and make the DIY from the ground up.
As for your existing vac chamber, just make sure the materials are suitable for the function you will be using them, and if you can use the 3-way valves depends on what position you are using it in. The 3-way can be used when one port doesn’t interfere with the operation of another.
There is one thing that isn’t clear until the end: the whole setup has two objectives not just the one to concentrate the tincture. The second is to recover reusable ethanol. Why not just use an Instapot and forget about reclaiming ethanol as another option?
This article is mostly written for those who understand what a vacuum still is and its objectives. Performing distillation under vacuum is much different than open atmosphere distillation. Vacuum allows the process to work at a much lower temp as well as avoid destructive oxidation influences on the process. That’s not to mention the added advantages of safety, sustainability and processing value.
Excellent write-up, thank you so much for taking the time to get it all down. I’d love to view the shopping list – if you are still aporoving new group members, Alex S. is not a fake account.
What is the minimum cfm for the pump?
Cfm has little impact