
By Troy Ivan
ibc@ichibancrafter.com
I’ve been developing procedures and equipment for cannabis ethanol extraction for quite a while now, so I thought it would be helpful to show the community how the ethanol recovery process works and provide DIY options that suit almost every budget and purpose.
At the heart of the ethanol extraction process is the ethanol recovery stage. This is where the ethanol used as a solvent is distilled away from the cannabis oil it collected to leave a beautiful cannabis concentrate on one side and the recovered ethanol separated and ready for reuse on the other.
THIS IS DISTILLATION
This process is called “distillation,” the equipment used is traditionally called a “still.” A traditional still is like what’s used for making moonshine and other spirits. Simple stills operate under ambient pressure with rudimentary coil condensers at high temperatures. They are simple in form and very easy to operate. On the opposite end of the distillation equipment spectrum is the “rotary evaporator” (rotovap). They have very tight vacuum and temperature controls that make them very expensive and require training and experience to use correctly.
A simple still and a rotovap perform the same distillation process of evaporating a solvent (ethanol in our case), condensing the vapor, and collecting that condensate. In theory, it’s that easy. An ethanol tincture becomes exponentially more unstable and challenging to control with every additional unit of heat and/or vacuum applied. Which system is better is only determined by the desired final product. Using a simple still as a low-tech, low-cost way to make traditional Rick Simpson Oil (RSO) or Full Extract Cannabis Oil (FECO) can be okay. However, any cannabis concentrate that requires maintaining terpene content and avoiding component degradation requires the effort and expense of working under vacuum at lower temps like with a rotovap or other expensive consumer products.
Fortunately, with a little effort and know-how, we can assemble a DIY vacuum-assisted still for low-temperature ethanol recovery just like much more expensive equipment at a fraction of the cost. That’s the road we are starting down today.
IN THIS POST: UNDERSTANDING
In this post, I will focus exclusively on the general components and processes that make a DIY vacuum still an excellent option for clean ethanol recovery in the cannabis extraction process. This will build a solid understanding of the system itself and the process dynamics of how it operates. Part 2 will then expand on this knowledge with detailed operational guidance to make the cannabis concentrates you want. I will also provide specific info on where to find components for every budget and need.
I won’t be covering the details of cannabis extraction in this post. If you are unfamiliar with the general ethanol extraction process, please see my post, “Ethanol Extraction: Complete Breakdown.”
SIMPLE STILL
Components
The components of a simple still are very rudimentary and consistent with a moonshine rig, water distiller, or Air Still. The components in a water distiller or Air Still are compact and stacked on top of themselves, but they are the same components doing the same thing nonetheless.

Process
The simple still distillation process is easy to understand in the context of things we see every day. For example, when taking a shower, the warm water vapor travels and condenses on the cooler surfaces of a mirror. Also, on a hot and humid summer day, the moisture in the air will condense on the surface of a cold soda can. The same process of warm vapor condensing into liquid when cooled occurs during the distillation process.

Heat is applied to increase the temp of the liquid in the loading vessel. The temp of the liquid can only rise to its evaporation point and no higher. Like water can’t exceed 212°F when boiled, ethanol can’t exceed 173°F. If more heat is applied, it boils more vigorously and creates more vapor but can’t get hotter. The low evaporation point of ethanol allows the ethanol to evaporate first and the cannabis oil to remain at the end.
As evaporation happens, the vapor creates higher pressure inside the loading vessel. This causes a sucking of the vapor through the condenser to the lower ambient pressure outside. While the vapor passes through the condenser, it cools, returns to a nearly pure ethanol liquid state, and drains into a collection vessel.
VACUUM ASSISTED STILL
Components
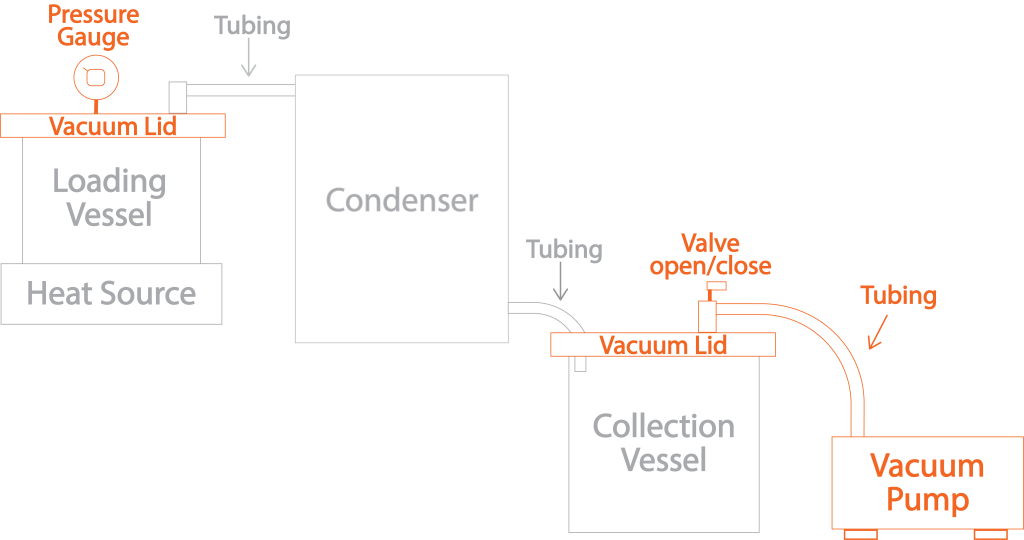
Several additional components must be added to go from an open, ambient pressure simple still to a closed vacuum system. The additional components added are highlighted in orange in the diagram below. Instead of detailing each part here, let’s discuss their function in the next ‘Process’ section.
Component Bonus Value!
The main disadvantage of the DIY system is that the components are separated and a little clumsy compared to something more compact like the EtOH PRO. However, the adjustable component configuration is also one of its most significant advantages. Every part can be customized to specific budgets and processing needs. Still, more importantly, the system already includes components you would otherwise have to purchase separately for filtration and post-processing. The right heat source with one of the vessels, a vacuum lid, and the pump can double as a heated vacuum chamber for post-processing, and by adding a Buchner funnel to the pump, any filtration needs are also satisfied. The advantages and savings of going DIY are many.
Process
The new components allow the system to run the distillation process under vacuum and at lower temps without leaking air from the higher ambient pressure around it. Hence, I call it a vacuum still. By purging air from the connected components, a negative pressure vacuum environment inside the entire system is created, lowering the evaporation point of ethanol and providing the ability to process cannabis extracts at temperatures that significantly improve quality.

Creating a vacuum in the system is similar to taking a plastic straw, covering one end with a finger, and sucking from the other. You feel the negative pressure pull on the finger covering one end, it becomes more difficult to suck as the air is removed, and the structure of the straw collapses when you suck hard enough.
As the vacuum pump expels air from the system, the vacuum lids suck down to form a seal (like the finger on the end of the straw), and the pressure gauge will display the system’s decreasing pressure. When the desired vacuum level has been achieved, the valve on the collection vessel lid can be closed. Once closed, the empty system (assuming no leaks) will stay at that negative pressure until the valve is opened to allow air to flow back in and equalize the system to ambient pressure.
Creating the vacuum on the empty system is pretty straightforward and easy. Next, we will complicate this by examining what happens when vapor is produced during the ethanol recovery operation.

This is where things become just a little more complicated and super interesting. Internal conditions of an empty system under vacuum are relatively static. That changes when we move into the ethanol recovery process and must balance heat, vacuum, vapor, and condensation while all are in flux. Fortunately, it’s easier than it sounds.
Even though the entire system is under vacuum, the heat and vapor pressure dynamic described in the simple still will also be created here. Vapor is pulled through the condenser and deposited as a liquid into the lower-pressure environment of the collection vessel. The difference is that this is now a closed system compared to the open nature of the simple still. The open system will always have a lower-pressure environment because it’s insured by the ambient atmosphere. Contrarily, in a closed system, the heat and vapor will increase and eventually equalize the pressure of the whole system. Increased system pressure causes a couple problems. First, the same heat input will become insufficient under increased pressure to foster boiling, evaporation, and sufficient vapor creation. Second, vapor will no longer be pulled through the condenser toward the collection vessel at a reasonable rate. These problems are easily overcome with the application of a little vacuum.

By applying additional vacuum mid-process the vacuum/vapor balance will return to its previous state and a satisfactory rate of production. The pump will purge air, suck condensed ethanol from the condenser into the collection vessel and lower the vacuum level in the system. The vacuum level will now be sufficient to maintain vapor creation at the preset heat input and pull vapor through the system efficiently once again. The right balance will show a nice flow of vapor into the condenser and a nice flow of liquid out of the condenser and into the collection vessel.
Vacuum adjustments are necessary more often at the beginning of the process as everything comes up to temperature and settles in. Once the temps throughout the system stabilize, the need for vacuum adjustments becomes less. After managing this balance for a while, a cannabis concentrate will be ready for collection from the loading vessel, and the pure ethanol in the collection vessel. How long this takes depends on the temp/vacuum combination and the volume being processed. A gallon of wash should take 2-3 hours to process with optimum setup and operation, and small amounts can be done pretty fast.
To collect the glorious cannabis extract the vacuum must be released by “breaking” the vacuum to open the system. The valve on the collection vessel lid is the only way to break vacuum in the current configuration. Can you see the problem breaking vacuum there might cause?
I intentionally omitted a single, very important part when introducing the components for simplicity’s sake. Now that we understand how everything works for processing, let’s add that last component, the vacuum break valve. The valve has been added to the loading vessel vacuum lid where the air is shown entering the system on the diagram below. This valve is always closed except for the very end when the system is to be shut down and opened.
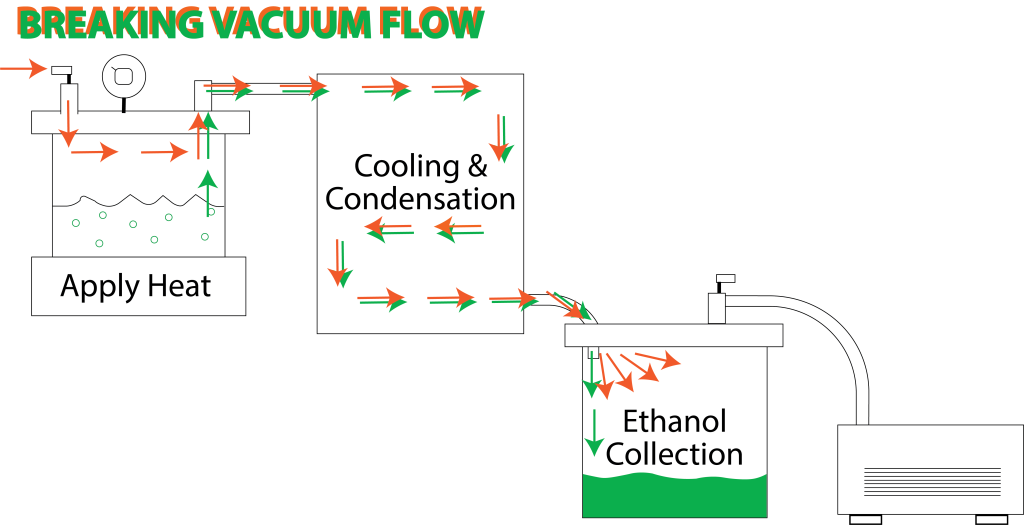
Without this piece, there’s no way to break the vacuum and open the system without flushing any ethanol in the condenser back into the loading vessel and onto the finished concentrate. The additional loading flask lid valve can break the vacuum, and the incoming, pressure-equalizing air pushes through the condenser and flushes ethanol into the collection vessel where it belongs.
GET READY FOR PART 2
With the general components and process of using a vacuum still for ethanol recovery, it’s time to get much more specific details. In Part 2, I will go into each component in detail and present options for each component to customize a DIY vacuum still for exact needs and budgets. To make that as easy as possible, I plan to also provide a shopping list where different components can be purchased. Finally, I will detail how to operate the system from beginning to end to craft great cannabis concentrates.
I think this is the interesting and informative blog have have ever had the pleasure of reading o love the ideas and I plan to memorize this dirt part of this blog so I’m ready to learn the 2nd your a great teacher my friend ty
Very nice Troy this was a very easy read and all in all a pretty easy diy build thank you for taking the time to do this for all of us. I out grew my turbo a long time ago this is gonna be nice to be done in 2 to 3 hr instead of all day and into the night running the machine and constantly adding ice. Thanks again Troy.
Thx for the great read. Looking forward to next part. 2.. EtOH PRO. My next read thx to you :}
Read the EtOH Pro. I think your versatile setup will be best for my pressed rosin going forward. The $1799 420 sale was tempting.
This option will be substantially less expensive and very customizable.
Once you understand how everything actually operates it’s pretty simple. To have the ability to customize the system with off the shelf components will make this quite less extensive and also include the parts that also double as post processing and filtering uses. More hands on but very worth it
Hello. Can you please help me in finding the parts to make this system? I have an induction cooker and a stainless pot. I need to procure the rest of the components. Where do you suggest i search for these?
The information is in Part 2. It also explains why stainless may not be the best option but there are ways to make it work.
The Bvv stuff order through Nina Black. She will send invoice/discount. She makes it easy. P: 331-281-0154 D: 630-328-0433. My induction ran to hot. That Hot plate works easy. You want that non-stick loading vessel. Join that Facebook group. It works great. Get that Bucknell funnel. Myself, I wish I went bigger than 1000 ml
When you distill a mixture of components you get a completely new/different compound unless you are distilling at a very low temperature which most solvents come over at so I don’t get how this isolates just the ethanol in the end, please explain how you know you are getting pure ethanol in the receiving flask and not distilling some of your extract over in the process?
“Pure” is simply not possible. “Pure” would also involve breaking the azeotrope, usually done with benzine in the commercial setting or a molecular sieve in smaller applications.
If what you are asking is, might there be a very tiny amount of lighter molecular volatiles that travel with the evaporating ethanol? Yes, that happens. You can often smell the lighter components in the reclaimed ethanol. The amounts are negligible and don’t really merit worrying about when using reclaimed ethanol to extract the same type of botanical. If you get into extreme extractions like capsaicin, then that ethanol should be isolated and only used the the same kind of extractions.