
By Troy Ivan
ibc@ichibancrafter.com
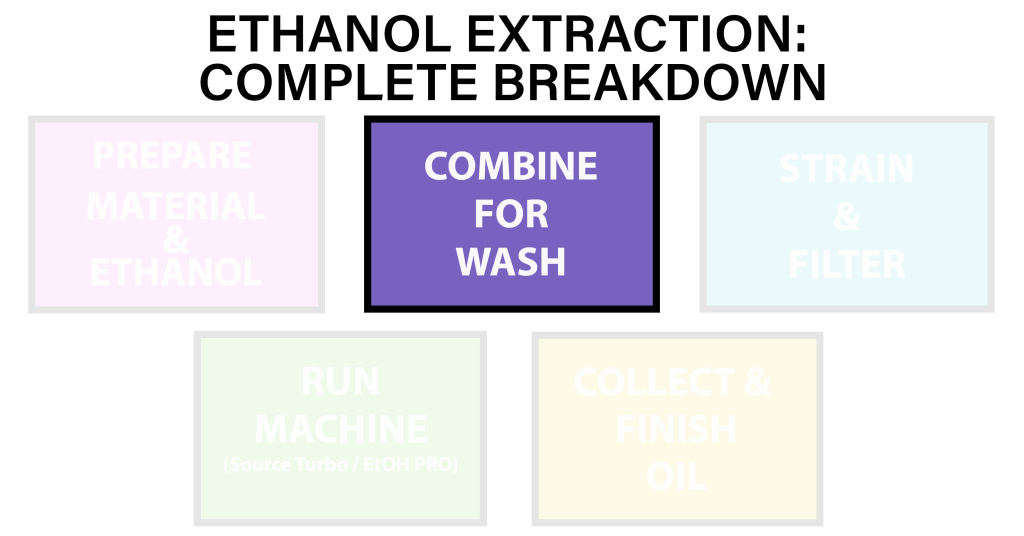
ETHANOL EXTRACTION: COMPLETE BREAKDOWN
The fundamental steps of ethanol extraction are straightforward and relatively easy. Still, for someone looking at it for the first time, it can quickly feel overwhelming with the considerations necessary to achieve various desired end products. It’s not difficult, but the unfamiliarity can make it feel like rocket science when it’s no more complex than cooking. You’ll be a pro once you are familiar with the basics, and the unfamiliarity fades.
Consider the general steps presented on the left as the fundamental steps, to begin with, and then moving to the right is the roadmap down the rabbit hole only necessary for those looking to improve their skills. Ethanol extraction is great because the basics are easy to get started with and quickly achieve great results. If you want to take it even further, you can add skills and tools to take it to the next level and then the next. Don’t worry, I’ll be here with you the whole way!
I’m concerned that the amount of information I will present here may feel overwhelming. I promise you if you just start working with the most basic steps, the rest will quickly fall into place, and you will not only impress yourself but all of your friends as well. Take it slow, piece by piece, and enjoy your adventure into scents, flavors, and medicinal properties that will blow you away. To help with your learning adventure, I’ve prepared a video series addressing the important points of each section. Here’s the introduction video and the rest of the series is presented in the following sections.

PREPARE MATERIAL & ETHANOL


Good fortune favors the well-prepared, and it’s just as important here as anywhere. How the material and ethanol are prepared lays the path for success for the entire extraction process. The desired extraction end product will predominantly determine how the material and ethanol are prepared.
MATERIAL
Starting material will significantly impact the quality of the end product. The old adage, “quality-in, quality-out,” holds true as a general rule. High-quality material is easier to work with than something like machine trim with substantial structural damage. Beaten-up material can still provide great value and potent medicine; it just takes a little attention. Trim, shake, kief, and such are pretty much ready to use, but nugs will require some consideration to use as is or break up into smaller pieces.
How the material was handled after harvest will also have a large impact on extraction quality. Ethanol extraction only works with material that has been properly dried to around a 15% moisture content or lower. Curing isn’t necessary for extraction, but it doesn’t hurt either. Fresh or fresh frozen material has far too high moisture content and will assuredly make a very messy, green end product.
Use as is or break up
Material with structural damage makes it much easier for the ethanol to pick up the green from the plant and chlorophyll, so that it can be troublesome. The advantage to material in this form, like trim, shake, and kief, is that it allows the ethanol to move freely across all surfaces and will be very efficient at picking up cannabinoids and terpenes.
On the other hand, intact nugs do a great job at keeping the green out of the extraction but make picking up all the cannabinoids the nug has to offer more difficult because the ethanol cannot penetrate the center of the nug in a timely manner. Even after soaking for 1 hour, the inside of a moderately dense nug can remain dry. Breaking up nugs gently by hand, at least in half, while doing the least amount of damage possible, can dramatically improve yield and no decline in quality. Yield efficiency and quality constantly work against each other, so achieving the best balance for you will take some experimentation.
Ethanol extraction has the great advantage of being able to process the same material more than once. This is important because you can process full nugs for the cleanest extraction and accept the low yield on a first run, then break up the same material and run it a second time more aggressively for a less clean but more efficient yield cleanup.
Decarb?
Determining if decarb before extraction is necessary is a critical consideration. This topic has been covered extensively in an earlier decarb post, so if you are unclear about all that’s involved in making this decision or how to perform decarb, please review here:
Decarboxylation (Decarb) 101: Basic Understanding and at home Method Comparison
There is now also the option of waiting until the end to decarb the finished oil which provides an advantage that never existed before. Decarbing a cannabis product with heat and saving the terpenes!!!
Jar Tech Decarb to Keep the Terpenes: Real FECO, Carts, and Terpy Deliciousness
PREP TEMP
For a long time, people have had the incorrect impression that ethanol extractions always come out black and heavily laden with plant matter. What temperature is appropriate for any extraction depends on the desired outcome and end product. Using temps ranging from room temp to -70°F, we have some control over collecting waxes, lipids, and chlorophyll. Temp is a tool to achieve different outcomes; none are right or wrong, just different.
Room temp
Room temp ethanol is the warmest that should be used for extraction. It will be very aggressive and grab everything it can making it highly efficient in the collection of cannabinoids as well as deeper plant components. NEVER use “butter makers” or other contraptions that add heat and/or chop material to prepare a wash or tincture, it’s the absolute worst possible approach.
Room temp extractions will be deep green to black with a strong green plant aroma and flavor. This is often called Rick Simpson Oil (RSO) or Full Extract Cannabis Oil (FECO). These extracts are great for many things, but for smoking and vaping, a cleaner extraction is necessary and can be accomplished by processing at lower temps.
Freezer, Medical Freezer, Dry ice
Cold temps make ethanol less aggressive but more focused on picking up desirable cannabinoids and terpenes, leaving the green matter and undesirables behind. Low temps are essential to making clean golden extracts, especially for vaping. A regular freezer, medical freezer, or dry ice can be used for low-temperature processing.
When using a regular freezer, have the cannabis and ethanol stored separately in the freezer for at least 24 hours. Medical freezers or dry ice can get the material and ethanol down to temp in a few hours. A very nice concentrate can be made using a regular freezer, so don’t feel like buying an extra freezer or dry ice is a requirement for quality products. Like any hobby or craft, higher levels of process application aren’t required but can be pursued if you choose; that’s where the dry ice, medical freezers, and very cold temps between -40°F and -70°F come in.
COMBINE FOR WASH
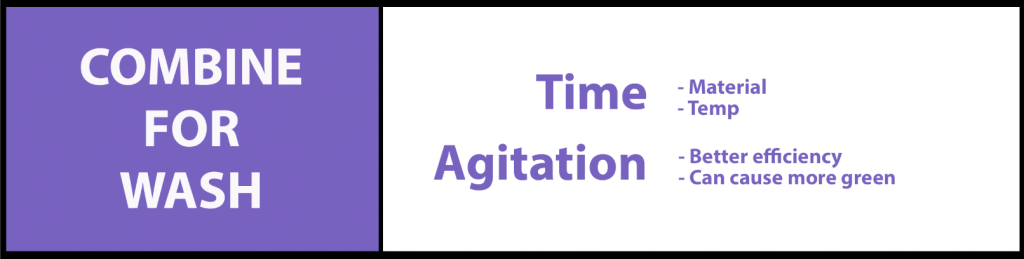
Ethanol and cannabis are combined to allow the ethanol, working as a solvent, to collect the desired components from the plant into what we call the “wash.” The wash is the same as a traditional “tincture,” so you may also hear it called that. How we combine the ethanol and cannabis for the wash will determine which components from the cannabis will be included in the final product. We have temp, time, and agitation to work with to exercise some control over the final outcome. The wash processing temp was decided in the previous “preparing material & ethanol” step, so now we concentrate on time and agitation.
(Never use butter makers, infusers, or gadgets that add heat, chopping, and complicate this step.)
TIME
This is the most complex and frustrating part of the process because there is no steadfast rule, only estimation and observation. This is where the art of extraction meets the science. The amount of time the ethanol and cannabis are combined will allow or restrict the ethanol from performing its solvent duties. If it soaks too long, it can become green, and if the soak is too short, the yield will suffer. The exposure will be longer for making RSO/FECO and shorter for vaping oil at any given material and wash temp. It can be difficult and frustrating because every extraction will be different when the material or temperatures are changed, and it’s not reliably predictable without building an experience base.
Material
We know damaged material will leak green plant matter more easily than mostly intact material. It should then be evident that to avoid picking up green, the damaged material would have a much shorter soak than intact material for comparable results.
Temp
Expertise in managing the time and temp balance comes quickly with just a little experience. It’s tough to put a finger on it in words, but once you work with it a few times, it will be clear.
At room temperature, popular for making RSO/FECO type concentrates, the ethanol will pull green almost immediately, regardless of the condition of the material. Even for a relatively short wash, a lot of chlorophyll, wax, and lipids will collect in a room-temperature wash. You will undoubtedly hear “I’ve been doing this for 30 years” old-schoolers telling people they need to soak for days, weeks, or even months, but I would strongly disagree. Ten minutes is plenty, 1-hour is more than enough, and 24 hours is substantial overkill, but some people may want to do it anyway. Anything longer is not necessary.
Cold temps appear to slow ethanol’s cannabinoid pick-up efficiency considerably. There is a noticeable reduction in undesirable pickup up and yield efficiency as temps get lower and lower. This is why the exposure time for the wash in a freezer will be different than dry ice or a medical freezer. While very clean, the freezer extraction will not be as clean as the colder temps, and the colder temps will have considerably lower clean yield for the same duration of exposure.
A typical wash exposure time for working with freezer temps (0°F to -5°F) can range from 1 minute to 24 hours. The shortest exposure is for a clean extraction with significantly damaged material, and the longest for making a cleaner version of RSO/FECO with everything in between is a sliding scale depending on the material and desired extraction outcome. A good exposure range for a clean vape concentrate using good material is 5-20 minutes.
For the dry ice and medical freezer temps (-40°F to -70°F), the exposure time elongates significantly from as short as 20 minutes out to 24 hours. This range has been stretched out to as far as a week at the coldest temps, but I have found it’s unnecessary to stretch that far. In my rudimentary experiments (in no way absolute nor definitive), I’ve seen yields top out after about an hour or two.
AGITATION
Agitation is gently shaking the container periodically during the wash process. This helps move the ethanol around, disrupting trichome stability, getting the solvent to cover all surfaces thoroughly, and minimizing saturation layer points.
Better efficiency
Agitation helps with the efficiency of pickup, meaning that actively moving the ethanol around and through the plant material aids the ethanol in picking up more of the oil the plant has to offer. Working with colder temps makes agitation more critical because of the slower efficiency we experience as temps get lower. Combining low temps and no agitation will lead to surprisingly low yields.
Can cause green
The image of damaged, ripped, and torn edges of plant material makes it easy to visualize how easily ethanol can come into direct contact with the green matter inside the plant material and collect it. With that in mind, it’s evident that in addition to increasing the cannabinoid collection efficiency, agitation will also quickly increase how much green the ethanol picks up. If you don’t mind the green in your extraction, you can shake it up as much as you like. On the other hand, if you shoot for a clean extract, you have to be more careful, only increasing the agitation intensity when the material is more intact and as temps get lower. Even heavier agitation with good intact material won’t affect quality, but the more damaged the material is, the higher the chance of green leak.
STRAIN & FILTER


Once the wash is complete, the next step is to isolate it from the plant material for further processing by straining and filtering. Straining is straightforward, but filtering may be as simple as a couple of coffee filters or beginning down the rabbit hole with slightly more complicated, finer filtration equipment depending on the desired end product, required quality, time value, and budget.
STRAIN
Removing the larger plant material quickly serves two purposes: it gets the material away from the ethanol quickly to arrest the risk of picking up green and removes material that will quickly clog filters in the next step. When making deeper RSO/FECO extracts, separating the plant material expediently is probably not a priority, but when making the cleanest possible extract with cold temps, it’s helpful to separate the plant material away before it begins to warm.
Strainer
A simple metal mesh kitchen strainer works perfectly, allowing the ethanol to flow quickly and uninhibitedly away from the material. Set the strainer atop a collection bowl and pour the contents into the strainer, catching the roughly strained wash in the bowl. The roughly strained wash isn’t quite clean enough to be processed yet; having small plant material particles in the wash will act as sediment during processing and cause splattering.
Mesh material
Nylon mesh material is convenient but not as easy to buy or inexpensive as a kitchen strainer. This is just an option to make processing easier down the road, and it’s not a necessary piece of equipment. It comes in a large swath down to about 40-micron and can be cut into appropriately sized sections. The 40-micron size works well because the flow is still fast with the large surface area and catches many smaller particles. Mesh brewing or nut bags are similar, but they have sewn-in corners and seams that I find more challenging to manage. In contrast, the sheet-material shape can be manipulated as necessary in the process and laid flat for easy cleaning, drying, and reuse.
I lay the mesh material over a large strainer set atop a bowl, apply clips to hold it in place, and then pour the soaking material and wash into the mesh, catching the well-strained wash in the bowl. It’s better than just an ordinary strainer alone and will make filtration easier, but it’s not important enough to worry about and rush out to buy.
FILTER
After straining, there will still be small, fine particles remaining in the solution that can be cleaned up with filtration. The fine particles can be difficult to see in the larger liquid volume of the wash, but once the ethanol begins to decrease in volume, those particles become a larger and larger component as the extraction reduces to a concentrate. How much that matters depends on what’s being made and the quality required. For some applications, a single pass through a coffee filter may be sufficient; for others, finer filtration with the Buchner may be necessary, or some may even go to the extra lengths of winterization.
Coffee filters
Unbleached coffee filters are the most straightforward and most accessible form of filtration. A typical coffee filter is about 20 microns, sufficient for edibles and topicals but inadequate for the best quality extracts. Two coffee filters can be stacked for better filtration than a single layer. The main disadvantage to using coffee filters is that it takes quite a long time for the wash, pulled only by gravity, to flow through them. It is a good idea to try filtration with coffee filters before moving into a Buchner funnel set because it may suit your needs and save some cash. Once the wash has been satisfactorily filtered, it can run through the machine or be cleaned up further with winterization.
Buchner funnel
The Buchner funnel set has three main components: funnel, flask, and filter paper. The Buchner funnel is also available with a fixed glass frit instead of the paper filters. I wouldn’t recommend that for this level and application because they clog quickly and are very difficult (impossible) to clean. Buchner funnel filtration provides a few advantages over coffee filters. First, it’s a big-time saver. The vacuum-assisted flask pulls wash through the funnel and filter paper much faster than gravity pulls it through a coffee filter. Second, there’s a wide variety of filter paper grades and speeds, providing great versatility and control. Fast flow filter papers are about 20 microns, medium 12 microns, and slow 3 microns. Third, excellent filtration creates the highest quality concentrates. Once the wash has been satisfactorily filtered, it can run through the ethanol recovery process or be cleaned up further with winterization.
Here is a good video explaining all you need to know about Buchner filtration. https://www.youtube.com/watch?v=LMSpOBjiY-M&t=15s
Winterization
During the wash process, ethanol can pick up lipids and waxes that may or may not be desirable. Some botanicals have more lipids and waxes than others, so knowing the characteristics of the botanical being used and planning for the desired end product will determine if winterization is necessary. For topicals, the lipids and waxes may benefit the final formulation. For edibles, going through the extra step of removing lipids and waxes isn’t necessary unless you are looking to cook with the cleanest extraction possible. However, for vaping concentrates, eliminating lipids and waxes is important for potency, taste, smoothness, and ease on the lungs.
Winterization is a process of subjecting the filtered wash to freezing temps for a period while the lipids and waxes fall out of the solution and coagulate into a gelatinous form that can be filtered away, leaving an incredibly cleaner wash. To do this, the wash can either be placed in a freezer for 48 hours or on dry ice for 3-5 hours, then run through coffee filters or a Buchner with a medium flow filter or two fast flow filters so it goes faster than a slow filter would and you don’t have to worry about temps warming.
If the wash was effectively processed with cold temps, it’s possible that wax and lipid pick up was already avoided and would make winterization unnecessary. When I work with cold temps, I generally skip winterization, but it’s a tool I often go back to to ensure I have the cleanest possible extract.
Now the wash is definitely ready for processing………unless you want to scrub.
Scrubbing
Scrubbing is an advanced technique for lightening color and removing undesirables from an extraction intended for vaping. This step is quite a way down the rabbit hole and unnecessary for 95% of at-home extraction applications. This isn’t out of the reach of ordinary people to execute and can be fun to experiment with. It’s an advanced process that takes it to the next level, but it isn’t essential to make high-quality extractions. Professional labs (or advanced basement labs….) work with “Color Remediation Columns” (CRC), nearly the same thing as us scrubbing with activated carbon (AC), diatomaceous earth (DE), and other filtration media. For more information, see the link provided at the end of this post.
RUN MACHINE


We’ve crafted a spectacular wash, and the “extraction” phase is over. Now, we move on to the ethanol recovery phase, separating the cannabis oil and ethanol that are together in the wash. Ethanol evaporates at a lower temp than most of the other cannabis components, which is what allows this process to work. As the ethanol evaporates, the cannabis oil becomes more and more concentrated, hence becoming a “cannabis concentrate.”
At this stage, in the not-so-distant past, we would’ve been talking about old-school rudimentary, unsophisticated applications like allowing the ethanol to naturally evaporate into the air or using ad hoc tools like rice cookers or water distillers. These traditional techniques will allow for some degree of success in making only heavily oxidized and overly decarbed oil. Fortunately, we now have the ability to more closely simulate lab processes and higher quality results by working with vacuum and low temps at home with easy-to-use tools like those presented in the DIY Vacuum Still blog posts and video:
Video running the DIY Vacuum Still
DIY Vacuum Still (Part 1): Components and Process
DIY Vacuum Still (Part 2): Putting Together and Operation
Ethanol recovery, under vacuum, at low heat, with a fast production rate and nearly perfect recovery efficiency while keeping the oil under control, is the most technical part of the ethanol extraction process. Don’t be intimidated; it’s not that hard, especially if you follow my DIY guidance.
(Considering the current state of ExtractCraft, I can no longer recommend the equipment. I have serious concerns about the quality of equipment they are producing and the company’s longevity, which makes it uncertain how long they will be able to properly support the equipment they sell and provide quality customer service.)
This section will look at what’s happening in the equipment that allows it to concentrate the oil and recover the ethanol. Then, we’ll take a look at when to stop the process. It’s straightforward when you know what you’re looking for.
CONCENTRATE – Reduce to concentrate
After loading the wash and starting the process, the vacuum pump lowers the pressure atmosphere inside the loading vessel to a point where the ethanol can evaporate at around 100°F. As the ethanol evaporates and is separated during the process, the wash will become a more and more concentrated tincture, eventually turning into a very potent oil consistency.
*Processing Note: People often want to stop the run part way through, add more wash, then restart the machine. This is not recommended as it provides no advantage, will cause bumping which makes a mess and will lower the quality of the first run by (re)processing it much longer than necessary. Run one load at a time, start to finish: concentrate, recover ethanol, and stop.
RECOVERY – Ethanol recovered
As the process evaporates ethanol away from the wash, it is condensed and recovered away from where the wash continues to concentrate. The high efficiency of containing the evaporated vapor, condensing, and collecting the reclaimed ethanol serve two fundamental purposes. First, it contributes substantially to the safety of the process by stopping flammable vapor from filling the surrounding area. Second, the ethanol can be reused for more extractions, providing real sustainability and economic impacts. The DIY systems pay you back every time you use them.
Even though the process reclaims all of the ethanol for reuse, a few considerations need to be understood. Ethanol can be evaporated and condensed over and over with no problem, as long as water isn’t picked up during processing or when equipment contains residual water from cleaning. With reasonable caution in processing, picking up moisture shouldn’t be a problem. Additionally, there’s a natural ethanol restocking cycle built into the ethanol extraction process that protects your production flow. Even with the machines returning almost all the ethanol loaded into them, the plant material used to make the wash will not. Depending on how aggressively you attempt to recover it, plant material absorbs 15%-30% of the ethanol used to make the wash. Lastly, the recovered ethanol will be crystal clear and appear “pure,” but you’ll find that some of the lighter volatiles from the extraction will travel with the ethanol as it evaporates and is collected. There may be a slight fragrance in the reclaim, which is no problem for reusing as it’s pretty minor and will most likely travel again when used. That said, some may want to keep the reclaimed ethanol of one type of botanical extraction separate from another, especially in extreme cases of strong botanicals like hot chili extractions.
STOPPING – Stop when ready
First-time users often fret unnecessarily about when to stop the process. Not having an exact shut-off time is another example of how science is intertwined with the art of extraction. The timing of when to stop the process and collect the oil is subjective, based on intended use and personal preference. The process can be stopped early when there’s still a good amount of ethanol remaining for a very concentrated tincture, or let it go longer to become an oil. I typically target a very light cooking oil consistency. The consistency can be observed in the process by tilting the machines gently to see how the liquid moves and decide when it’s ready. Some stop when it’s more fluid, so it pours out easily. Others let it go longer so the oil becomes stable more quickly after collecting. It’s all up to the crafter’s preference.
COLLECT & FINISH OIL

If I’m purposefully making a very liquid-like, high-alcohol cannabis concentrate tincture, it will go from the crucible into a glass bottle. Otherwise, when I’m ready to collect the oil, I put it straight onto a silicone mat, regardless of how thick or thin it is, using a mini-silicone spatula to help collect the goods from the crucible while it’s still warm. When the oil is so thin it will flow off the mat, I make a boat out of a silicone mat by pinching each corner with a binder clip. Once on the mat, I typically let it cool and plan for what I will do with it next.
*Processing Note: Use the unprinted side of any silicone mat with a logo or design printed on it. The printing will eventually peel and flake off, so to keep it out of your concentrate, use the side without printing.
The oil produced by the end of the process is the foundation of most concentrates and can be used in many ways. It can be used as is, decarbed, or post-processed to increase stability. What you do with the finished oil depends on the ultimate intended use of the concentrate.
Please know the knee-jerk reaction/question, “How do I get ALL the alcohol out?” is fundamentally flawed because there will always be some residual ethanol remaining even if only measured in “parts-per-million” (ppm), and that’s okay. The idea of residual ethanol causes some people to be concerned and conclude that any remnant of ethanol is terrible. If it were known to be bad, I wouldn’t be using it, writing about it, or recommending it. To keep it in perspective, think about what we are working with food-grade ethanol (alcohol) that has no known adverse health effects when consumed orally or vaped in minuscule amounts. It’s also helpful to remember that a bottle of vanilla extract used for cooking is typically 35% alcohol by volume, and no one worries about that, right? So, the question isn’t automatically, “How do I get ALL the ethanol out?” The question should be, “How much residual food-grade ethanol is acceptable for me and my application?” That question will determine if you use the oil as is or to what degree post-processing is necessary.
USE AS IS – Edibles, tinctures, topicals
When the process is stopped determines how much ethanol is present in the concentrate at that point. If the process is stopped very early and it’s water-like, the alcohol component will be relatively high and similar to the vanilla extract used for cooking mentioned earlier. This is what I would call a “tincture concentrate” and can be used for cooking or incorporated into other formulations. If consumed orally, the large ethanol component will have a significant flavor and burn in the mouth.
When the process is stopped at an oil consistency, it’s probably between 3%-5% (30,000-50,000 ppm) residual ethanol. This sounds high, but it’s not something to automatically worry about for many applications. The ethanol is food-grade and meant for human consumption. Ethanol will continue to evaporate and purge from the finished concentrate even after it’s been collected. It will also become much more diluted when incorporated into a larger edible recipe or formulation. The applications for using this as is would be for tincture concentrates, edibles, and topicals. Contrarily, for vaping concentrates, even though I don’t know of any documented adverse health effects from vaping ethanol, post-processing to reduce residual ethanol to a lower level makes the concentrate much better.
POST PROCESS
When the freshly finished oil is not suitable, and decarbing the oil is unnecessary, post-processing will be performed to increase stability by reducing residual ethanol. Post-processing is called “purging” because the ethanol is further purged from the concentrate. Deeper purging is necessary for making concentrate forms for vaping, like wax, crumble, pull-n-snap, shatter, sauce, and vape cartridges. Many methods are used in post-processing: air drying, heat pads, vacuum chambers, and vacuum ovens.
Air Drying
Air drying is the most accessible and basic post-processing approach achieved by spreading the oil in a thin layer on a silicone mat and allowing the ethanol to evaporate as the oil cures naturally and becomes more stable. Once it’s mostly stable, the concentrate can be moved to parchment paper if desired. This process can take anywhere from 1 day to 1 week, depending on the ambient environment, strain characteristics, and how much residual ethanol was in the concentrate when poured onto the mat. Under optimal conditions, air-cured extractions test down to around 2,000 ppm after a couple/few days.
Heat Pad
Oil on an appropriate silicone mat can be placed on a very low-heat heating pad like a coffee warmer or reptile warming pad to speed up the natural air-drying process. The added heat in the open air can lower the concentrate quality a little, so it may take some experimentation to see if the outcome suits your needs.
Vac Chambers/Oven
A vacuum chamber kit or vacuum oven can be used to take it to the next level by purging deeper and faster. This equipment adds vacuum to the post-processing, allowing ethanol to degas from a concentrate much faster and more efficiently than in an ambient atmosphere. Working at this level opens the door to increased stability and concentrate forms.
I always recommend that people start with air drying and move into more equipment after they get a feel for the natural purging process. This serves two purposes: it creates experience and knowledge of the base process and may save money if it’s determined that natural air purging is sufficient. Later, if you want to venture down the rabbit hole and work with the advanced equipment, you’ll be ready. Fortunately, if you are working with the DIY vacuum still for ethanol recovery, the components you need for post-processing are also included in the system!
Down The Rabbit Hole
There are even deeper paths down the rabbit hole with crashing cannabinoids to make sauce, using starches like cyclodextrin for powdered cannabis oil, ultrasonics for nano-emulsification, and short-path distillation to make distillate. These processes take a bit more knowledge, experience, time, and sometimes costly additional equipment. The bad news is, it’s so much fun you will have a hard time resisting being pulled further and further in.
Notes on post processing
Finally, there are a few things to remember with post-processing. Some materials and strains won’t become stable no matter what you do. Very terpene-rich material and some strains tend to make concentrates crash and sugar instead of becoming stable. Also, old material and extractions that are not well filtered, decarbed, or contain undesirable components like fats and waxes will resist stability. When people chase stability, they often lose focus on important things like terpenes and concentrate character and over-process their concentrates. Lastly, if very accurate residual ethanol and potency measures are necessary, the only way to know the real numbers is by having samples tested by an accredited lab. Anything else is just guessing.
MORE READING AND INFORMATION
I hope this has been informative, and I hope you give ethanol extraction a try. You’ll have much fun bringing to life creations you never thought possible. For more information on specific related topics, several links are provided below.
STAY LIFTED AND ENJOY!!!!
Decarboxylation considerations and methods: https://extractcrafter.com/2019/01/29/decarboxylation-decarb-101-basic-understanding-and-at-home-method-comparison/
Using dry ice for cleaner extractions: https://extractcrafter.com/2016/07/27/super-cooled-qwet-wash-for-cannabis-extraction-using-dry-ice/
Comparison of freezer temps and dry ice for extraction: https://extractcrafter.com/2017/06/28/cannabis-oil-qwet-extraction-battle-of-the-wash-dry-ice-vs-freezer/
Yield considerations when making the wash and concentrates: https://extractcrafter.com/2020/04/05/extraction-and-yield-its-a-balance/
Scrubbing and polishing extracts: https://extractcrafter.com/2018/09/22/polishing-dark-extracts-carbon-scrubbing-diatomaceous-earth-de-filtering/
Winterization explanation and process: https://extractcrafter.com/2017/12/04/winterizing-polishing-extracts-using-ethanol/
Cooking with, handling, estimating potency, calculating potency: https://extractcrafter.com/2020/04/18/cooking-with-cannabis-concentrates/
Making RSO and FECO: https://extractcrafter.com/2016/06/04/rso-feco-using-the-source-home-healing/
CHECKOUT THE IBC EXTRACTION LOUNGE GROUP ON FACEBOOK

Notable research that must have taken so much time to compile into useable guidelines. I applaud your dedication to the process
My ethanol is coming back slightly green, is that bad?
Yes. You are making a mistake somewhere
Thank you for your knowledge and experience you made this source turbo so easy to create your desires.
Do you suggest buying food grade ethanol or just use ever clear or golden grain?
Everclear is food grade ethanol. I don’t know Golden Grain but the ingredients list should tell you what’s in it
This is the best full explanation or the process that I have seen. CONGRATULATIONS!
I am making FECO capsules for oral consumption. I am considering adding some MCT oil to my wash before processing in the Source Turbo, so that the finished and decarbed oil is more viscous and easier to load into a capsule. Does anyone see a problem with this?
Why on earth would you add oil to a wash? It seems you read “ETHANOL EXTRACTION: COMPLETE BREAKDOWN,” did you happen to see any mention of doing such a thing? The process is simple and has been explained in painful detail…..just follow the directions!
Great article, thank you so much. I was wondering if any research has been done on how long FECO retains its potency when it’s stored in medical grade plastic syringes. How much potency does it lose and over what time period? Thank you so much for your time.
Potency would be stable for a very long time with normal storage in cool dark areas.
Hi Ichibancrafter, you certainly are.
Thank you for sharing this wealth of information.I would like to ask what your thoughts are on using acetone as a solvent. Lab grade acetone evaporates to nothing – no residues or anything left behind. Wikipedia states there are no known carcinogens, the body produces small amounts of acetone naturally. Acetone is an organic polar solvent that is non-toxic in small amounts and costs half of what FGE does. It also has a super low boiling point at 56 °C as opposed to ethanol at 78 °C. I have been using acetone for a while and the biggest downsize I have seen I think is it is a little more aggressive at picking up undesirables. I understand a lot more about pre-extraction temps to mitigate pick-ups thanks to you so I am going to experiment with some of your methods using acetone. I have been using my own acetone derived FECO everyday for almost two years now and I am fairly sure if there were side effects from acetone it would have presented by now.
A last thought that I read somewhere is that acetone is an extremely pungent solvent and even the slightest trace can be smelled by most humans which implies that when its evaporated and you cannot smell it at all anymore, it has completely evaporated.
Thank you once again.
Acetone is a great solvent which is why it’s used industrially for tough stripping jobs. I would never recommend anyone at home using it without lab protocols
Just a quick note to let you know how much I’ve enjoyed your work. Kudos!
Regarding the initial ethanol soak, have you considered using whole nugs in a whip cream siphon charged with nitrous oxide?
http://www.cookingissues.com/index.html%3Fp=4463.html
https://www.popsci.com/diy/article/2013-04/mystery-nitrous-powered-pot-infused-liquor/
Thank you for the kind words. This article you attached is COMPLETELY wrong on all points. First of all, I don’t want uncontrolled force applied to ethanol to drive into the plant material. I want controlled targeting of the desirable components. Secondly, ethanol is so aggressive it takes very little time for it to collect what you want from the plant. I discuss this pretty extensively in my writing about desirable components. The person that wrote the article, like most others writing on the subject, was writing before understanding the topic. All you need it ethanol and a jar, it’s very easy and no need to complicate the process
Thank you for responding. I agree that the guy in the PopSci article seems a bit clueless, but it was only based on Dave Arnold’s work in *culinary* extracts — everyone just took it over and ran with it.
It’s good to know that a gentle soak will get all of the good stuff!
Awesome write up, thank you for taking the time. I want to try decarbing the CO rather than the plant. Is there a reasonably priced hot plate & stirrer set up you could recommend? Or recommended brand? I see a bunch on Amazon but don’t want to take the chance in buying junk. Thanks.
Magnetic stir plates are one of the true examples of you get what you pay for in most cases. Good ones are costly and cheap ones are typically not so great. The good thing is I came up with the Jar Tech Decarb technique which is easier and shouldn’t cost much. Have you seen the Jar Tech Decarb post?
Hi, good article I tried the home freezer ethanol wash for the 20 minutes stiring every 5 min and came out with a good tan color product that produced very good vape,
My question is if it is the trichomes your after, can you use this same method right at harvest day?
No. Fibers will break loose and particles from the paper towel will end up in the wash. Ashless quantitative filter papers are what you need. There is pretty substantial guidance and options in this post in the filtration section.
but what would be best for this extraction? Fresh material that has just been harvested and placed directly in the freezer for processing, or do I have to dry the ganja first? What would be the difference between the result and the starting raw material?
grateful
I believe that is all covered in the first section of the article……..”Prepare Material”
Hi,
It’s the very first time that my extract gives me the WOW effect . I vape it, it’s golden like honey, and the taste and flavor are great (Time Wreck), I guess I could have purge it a little bit more but it’s night and day compared to the black tar thing I was making. Thanks a lot for all that nice work !
Thanks for the great article, cleared up some things for me. How long would you recommend for a purge in a vacuum chamber and what temps, to avoid over processing. I plan to decarb with Jar Tech Decarb after purging. Thanks.
I’m glad it helped. Hop in the FB group and post that question? It will get more attention there